Action Required: To play videos, please enable JavaScript or use a modern browser (Chrome, Edge, or Firefox).

SchoolPro Training Administrator Guide

We have been working hard over summer to bring to you a redesigned platform to manage your school and trust’s training as Enrolment Administrators, based off of your valuable feedback!

The link to the Training Administration dashboard is located towards the right when you scroll to the top of our website, when you’ve logged in. To get back to your ‘Course Profile’ page, you can click My Training Account at the top of any page on our website.

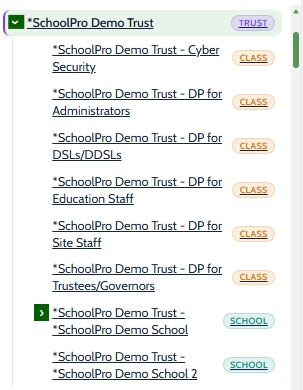
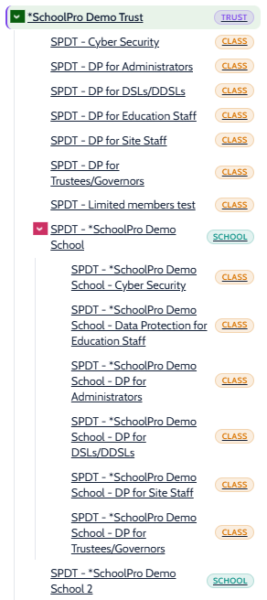
You will be able to see the different organisations that you have access to in the lefthand navigation menu. Under each organisation – i.e. trust or school – are classes for each course that is included in your package.

  • Generally, it is best to manage Enrolment at organisation level for the classes underneath it. You will be able to tick which courses they need and edit their accounts here
  • If you want to easily view and edit users in a particular class, you can do so on the class level Enrolment tab. Clicking on a class opens the dashboard in a new tab.
  • Resets and completion Reports have different scope according to the level that you are viewing on the dashboard – i.e. Trust, School or Class.
  • You can assign access to the Training Administration dashboard to new or existing members of staff in the Training Adminstrators tab. Administrator privileges are assigned at the level you are viewing and all levels below – e.g. if you assign and Administrator at trust level, they have access to the Training Administration for the classes assigned to that trust, all the schools in that trust and all the classes under those schools; if you assign them at class level they can only manage that one class. 

Either click Login on the top righthand of the green ribbon of our website and select Training Platform login or go  to schoolpro.uk/my-account and enter your email address and password.  These credentials are provided in your ‘Welcome’ email from contact@schoolpro.uk. 

Once you have done this, you will see your ‘Course Profile’ page showing all the courses that you are enrolled in. To get to the Training Administration Dashboard, click
Training Adminstration.
To get back to the ‘Course Profile’ page once you have navigated away, you can click My Training Account on the green ribbon at the top of any page on our website.

If you want to help your staff remember how to access their account when you send out reminders, it’s outlined in our short Training User Guide.

Staff can easily reset their passwords themselves, or you can do it for them.

  1. Select the “Enrolment” tab in the class or organisation that the staff member is enrolled in. 
  2. Click “User Account Management” 
  3. Find the staff member in the list and click “Reset password” on the left 
  4. A box will appear asking if you want to send a password reset email to the staff member — click “OK”
  1. Go to https://schoolpro.uk/my-account/
  2. Click on the “Lost your password?” link below the log-in box and follow the instructions for a reset link email to be generated.

⚠️TOP TIP: If you are adding new staff, and your current staff need to refresh last year’s training, perform the progress reset first so that you can refresh the full organisation or class, rather than selecting individual users to reset because your new starters have begun their courses.
Users are added at to the organisation level and then you are prompted to select which classes they need to be enrolled in. If you have access to the dashboard for more than one school, or for the central trust, you can navigate between them on the lefthand menu. You can edit a staff member’s details on the dashboard for any level they are enrolled in.

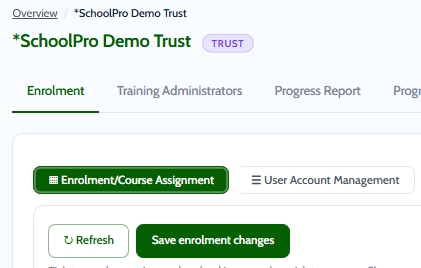
The below functions are found navigating to the Enrolment tab, and switching between the Enrolment/Course Assignment and User Account Management subtabs, as in this screenshot ➡️

At organisation level, navigate to the Enrolment tab, and select the Enrolment/Course Assignment subtab below. Scroll down to the section in the image and follow the instructions onscreen, which are also outlined below if needed.
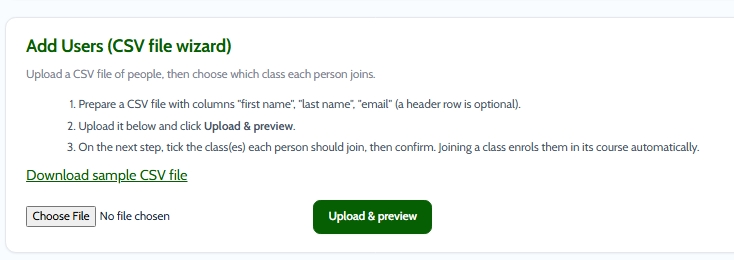
  1. Click Download the sample CSV file and open the file from the Downloads folder on your computer.
  2. Fill in names and email addresses of all staff that need adding to this organisation’s classes. (Make sure to not include the demo staff that show when you download the file.) 
  3. Save the file to your computer.   
  4. Upload the file by clicking Choose File then click Upload and Preview
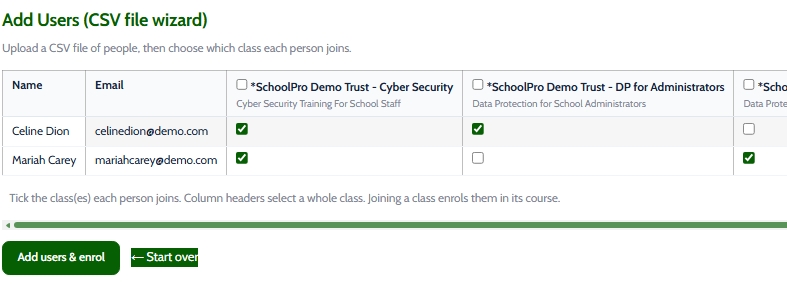
  5. You will then be prompted to select which classes they need to take, using the checkboxes
  6. Click Add Users and Enrol

You will get a confirmation displayed and you can refresh the list at the top of the enrolment tab to see the names in your full staff list. To do another bulk upload, refresh your browser. 

You can use this method at organisation or class level. Navigate to the Enrolment tab, and select the Enrolment/Course Assignment subtab below if you are in organisation level. Scroll down to the section in the image and follow the instructions onscreen, which are also outlined below if needed.

  1. Enter their details in the form. You can add an extra line for another staff member by clicking Add Another Staff Member. 
  2. When you’ve filled in all the details needed,  click Save & Next Step 
  3. Upload the file by clicking Choose File then click Upload and Preview
  4. You will then be prompted to select which classes they need to take, using the checkboxes
  5. Click Add Users and Enrol (At class level, this is the final step, refresh the class list to see the newly uploaded staff).
  6. At organisation level, this pop-up will appear; select the class(es) to enrol the staff in. 
  7. Click Add & Enrol to upload the staff and enrol them in the selected courses. 
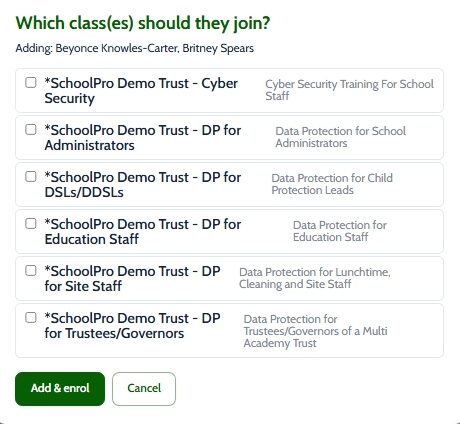
Their names will now appear in the staff list, with their relevant course checked at organisation level. 

There are two ways to enrol already-uploaded staff on a new course- both perform the exact same function and it’s just a matter or preference.

  • Option 1: At organisation level, navigate to the Enrolment tab, and select the  Enrolment/Course Assignment subtab below. Find the staff member in the list and check the class that you’d like to remove them from. Then click Save Enrolment Changes.
  • Option 2: At class level, navigate to the Enrolment tab, follow the steps in the above section for Enrolling Staff One by One, using the Search existing staff members box

There are two ways to unenroll staff from a particular course- both perform the exact same function and it’s just a matter or preference.

NB Do not press “Delete” as this will delete the staff member and all their completion records from the system. 

  • Option 1: At organisation level, navigate to the Enrolment tab, and select the  Enrolment/Course Assignment subtab below. Find the staff member in the list and uncheck the class that you’d like to remove them from. Then click Save Enrolment Changes.
  • Option 2: At class level, navigate to the Enrolment tab, find the staff member in the list, and click Remove next to their name on the left.

From the dashboard for any organisation or class that they are enrolled in, you can edit staff’s names/emails.

  1. Navigate to the Enrolment tab, and select the User Account Management subtab below. (At class level- you don’t need to navigate to the User Account Management subtab)
  2. Find the staff member in the list and click Edit, on the right.
  3. You will then be able to edit the staff’s new name or email address. 
  4. Click Save, on the right.

⚠️TOP TIP: If you don’t already have someone’s certificate on file, it’s worth retaining it before you delete someone from the system. Resetting progress for that individual or course, retains a downloadable copy on your dashboard, or you can download it and store it in your own archives. 

You can delete staff from the system on the dashboard for any organisation or class that they are enrolled in, and it will delete the staff member entirely. Any reports saved in reset history will still remain. 

  1. Navigate to the Enrolment tab, and select the User Account Management subtab below. (At class level- you don’t need to navigate to the User Account Management subtab)
  2. Find the staff member in the list and click Delete on the right. 
  3. A system message will ask you to confirm – click OK.

All added users will be sent a ‘Welcome’ email from the system. The email contains login instructions and credentials, plus a link to the Training User Guide

NB: They will not receive an email if they are already in the system, e.g. they are enrolled on another course already or they are already set up as a Team Leader.

You can customise the Welcome email and send other custom emails to enrolled staff to prompt/remind them of training by using the system’s email function (see Emailing the Team below). 

You can now set up new administrators for your organisation or specific courses yourself, when you navigate to the Training Administrators tab. When you add an administrator at organisation level, i.e. trust or school, they have access to the Training Administration dashboard for all schools and classes under that organisation. 

You can add new staff as Training Administrators by entering their details and clicking save. You will still need to enrol them in a course 

If someone is already enrolled in a course in your organisation, you can 

While on the Training Administrators tab, you can change the role of staff who have administrator privilege by using the dropdown menu in the Role column. 

  • An Enrolment Administrator can perform all functions on this guide
  • An Overseer can view enrolment lists and training progress reports, send password reset emails, and send prompt emails
  • Changing someone to User takes away administrator privileges and leaves them in the system, enrolled on their courses. They will disappear from the list of admins, on refreshing the page. To delete them entirely from the system– follow the steps in the n Managing Account Details section of this guide, above.

NB You no longer have to manually download and save a progress report when course progress is reset- a report and certificates save automatically in the Reset History section of the Progress Reset tab.

You can view your staff’s progress onscreen, or download a CSV file report when you navigate to the Progress Report tab. Different levels – i.e. trust, school or class–give you the option to view or download completion data for the relevant scope of staff that you need reports on. See below for more information.

At the top of the to the Progress Report tab, at each level there will be one or more buttons to download completion data for different scopes of enrolled staff.

  • Trust Level
  • School Level

  • Class Level

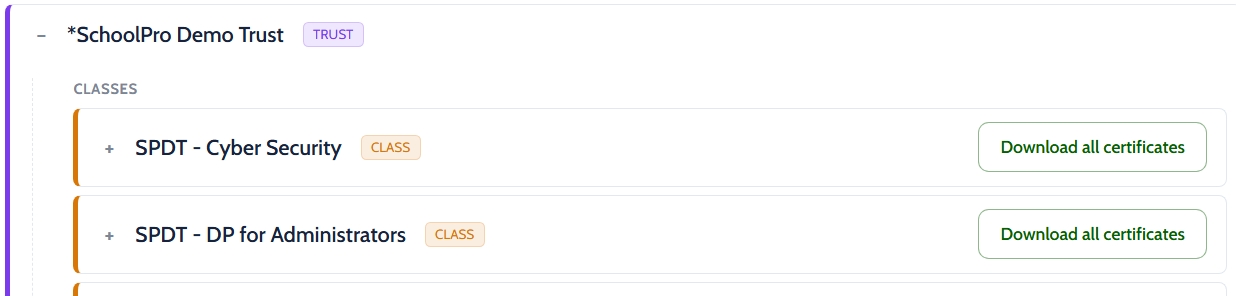
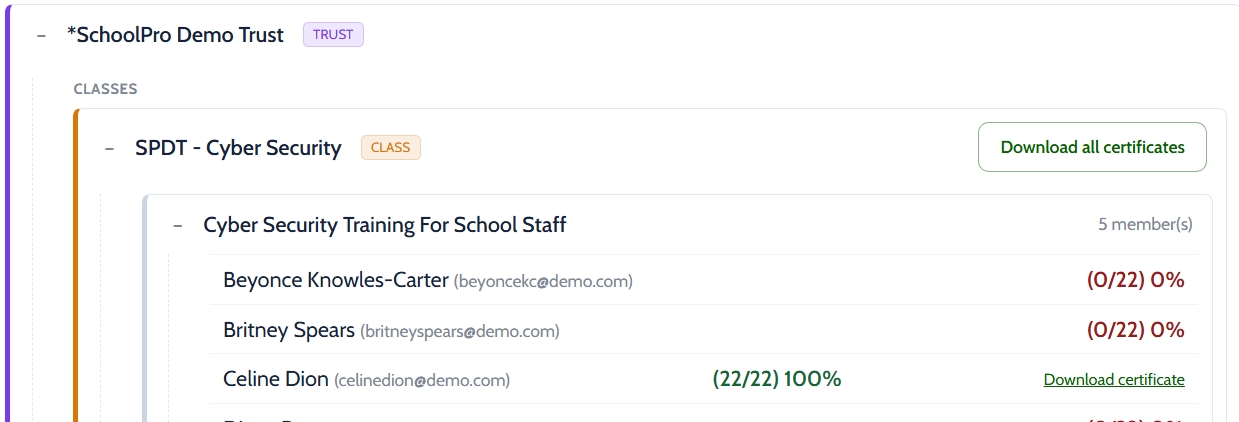
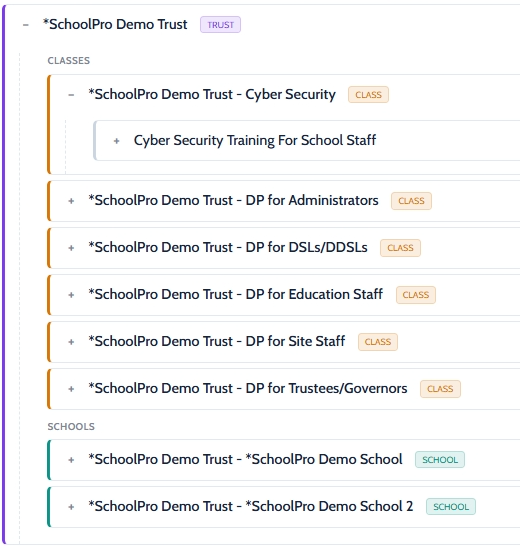
While on the Progress Report tab, at any level, you can view your staff’s completion progress without downloading a report. On each level you can view the completion for any class or school in that organisation by expanding the sections, as in the pictures below.

 

 There have been several key updates to how this works:

  • You can now reset staff’s course progress for training refreshment yourself. You can set this to run immediately or set it for a future date.
  • You no longer have to manually download and save a progress report when course progress is reset- a link to CSV progress report and zip file of certificates save automatically in the History section of the Progress Reset tab.

Navigate to the Progress Reset tab at any level’s dashboard and follow the prompts there to get started, or the instructions below if needed.

Different levels’ dashboards – i.e. trust, school or class– allow you to reset correspondingly larger or smaller sets of staff. If you want to reset an individual’s course progress, do so from the class dashboard.

  1. Select the scope
  2. Write in a reason for the reset e.g. “Annual Refresher” or “Post-Breach Refresher”, that will appear in the Reset History log.
  3. To perform the reset immediately, click Run Cascade Reset. (If the button is greyed out, that means that nobody has made any progress to reset)
  4. To schedule the reset for a future date, just fill in the date field before pressing Run Cascade Reset. 
  5. Certificates and progress reports for staff completion data is automatically saved on the platform- expand the section below for more information

Navigate to the Progress Report tab, if you ran the reset at organisation level, you will get a log with a link to a zip file of certificates, under History at the bottom of the tab. 

No matter which level the reset was run at, a more detailed course completion report is available for download on the Progress Report tab at class level – alongside the certificates zip file for those staff that completed the course.

There are three ways to access certificates:

  1. Certificates are automatically emailed to staff on completion of the course. Staff can also redownload their own certificates, as in the Training User Guide
  2. Past certificates are automatically retained in the Reset History Log, on the Progress Reset tab of the Training Administration dashboard, when you’ve resettled progress for that class/organisation/user. NB Any resets before 27/08/2026  will not appear in this log.
  3. Certificates are also available to download in the Progress Report tab. You can download certificates in a zip file for a full class, or for individuals, by expanding the organisation or class’s reporting section, as pictured below.

If you have any further queries, then you can email contact@schoolpro.uk or call us on 01452 951967 (option 2) for support. 

If you would like to give feedback, please click the Contact Us button below and fill in the feedback form, at the bottom of the page.

Choose your login:

Compliance Portal

Client portal access for subscribed school services and tools.

Data Protection, Health & Safety, Safeguarding, Data Analytics, Attendance, SEND Provision Mapping and more…!

Training Platform 

Access your online training, certificates and course progress.

Manage enrolment for Training Admin.